
Introduction
Sooner or later, every C++ project has to deal with CMake, dependencies, internal libraries, and applications built on top of those libraries.
In my first projects I often spent too much time organizing directories and keeping every CMakeLists.txt file consistent.
When the structure is unclear, adding a module or dependency can make the build more fragile than it needs to be.
After studying how other developers organize their projects, I found a structure I like for its simplicity and clarity.
What follows is opinionated. The structure is designed to:
- Avoid patterns that cause conflicts.
- Avoid making the build more complicated than it needs to be.
- Make the project easier to read.
Tools used
For this example I will use three tools.
CMake
CMake is a free, cross-platform software for build automation whose name is short for cross platform make. This software was born to replace Automake in the generation of Makefiles, trying to be simpler to use. In fact, on most projects there is no Makefile included in the sources, since that would not be portable.
-- Wikipedia
We will use it to generate the build system and compile the project.
This is not a complete CMake guide; the focus here is project layout. For deeper documentation, start from the official CMake website.
Conan
Conan is a dependency and package manager for C and C++ languages. It is free and open-source, works in all platforms ( Windows, Linux, OSX, FreeBSD, Solaris, etc.), and can be used to develop for all targets including embedded, mobile (iOS, Android), and bare metal. It also integrates with all build systems like CMake, Visual Studio (MSBuild), Makefiles, SCons, etc., including proprietary ones.
-- Conan
We will use it for dependency and package management.
For more details, see the official Conan website.
Before moving on, here are the minimum Conan steps used in this project.
Start by generating a Conan profile, which describes the compiler, build configuration, architecture, and other environment settings.
conan profile detect --forceWhen the command finishes, if you are on Unix, you'll find a .conan2 folder in your home directory containing the files mentioned above.
To install dependencies, run:
conan install . --output-folder=build --build=missingConan then performs two main operations:
- It installs the libraries specified in the
conanfile.txtfrom a remote server, usually Conan Center, if they are available. This server stores both Conan recipes, which define how the libraries should be built, and binaries that can be reused so you don't have to recompile them every time. - It generates several files in the build directory.
- CMakeDeps generates the files needed to let CMake find the libraries we downloaded.
- CMakeToolchain generates a CMake toolchain file so we can build our project with CMake.
Doxygen
Doxygen is an application for the automatic generation of documentation starting from the source code of a generic software. It is an open-source project available under the GPL license, written mostly by Dimitri van Heesch starting in 1997.
-- Wikipedia
Doxygen generates documentation from comments in the source code. As with the previous tools, this article will not cover it in depth. For details, see the official Doxygen website.
Structure
The project structure looks like this.
.├── CMakeLists.txt├── conanfile.txt├── conan_provider.cmake├── libfoo│ ├── CMakeLists.txt│ ├── docs│ │ └── CMakeLists.txt│ ├── include│ │ └── libfoo│ │ └── foo.hpp│ ├── src│ │ └── foo.cpp│ └── tests│ ├── foo.test.cpp│ └── main.cpp└── standalone ├── CMakeLists.txt └── main.cppLet's go through it more carefully.
The underlying idea is to separate project components by directory. Each directory contains either an executable or a library and defines its own target.
standalone is the executable target. In this example it uses the libfoo library and represents an application built on top of one or more core libraries.
libfoo is a static library used by standalone, but it is organized as a self-contained component with a public interface, implementation, tests, and documentation.
Each library has to:
- Follow a predictable structure.
- An
includedirectory for public declarations, which form the library interface. - A
srcdirectory for definitions and private headers.
- An
- Provide documentation generation through Doxygen.
- Provide a testing environment with doctest (or similar).
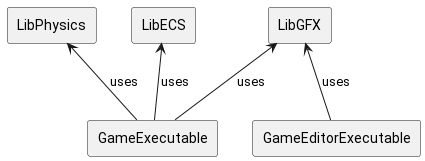
The image below shows the idea: app executables use core libraries, while each component stays separate.
Top-level CMakeLists.txt
The CMakeLists.txt at the root contains the top-level configuration of our project. Its contents are below.
cmake_minimum_required(VERSION 3.27)### Projectproject(cpp_project_structure VERSION 1.0 LANGUAGES CXX)set(CMAKE_CXX_STANDARD 17)set(CMAKE_EXPORT_COMPILE_COMMANDS ON)### Packagesfind_package(fmt REQUIRED)find_package(doctest REQUIRED)find_package(Doxygen REQUIRED)### Subdirectories (the order is important)add_subdirectory(libfoo)add_subdirectory(standalone)We have a single project and we tell CMake to look for other configuration files in the libfoo and standalone subfolders, respectively "core" and "app".
We then specify a few simple variables and issue find_package commands to look for the dependencies needed by the build process.
Dependency management
The conanfile.txt file specifies the packages our project's targets need. In our case fmt is used by both libfoo and standalone, and doctest is required by libfoo for unit tests.
Its contents are below.
[requires]fmt/10.2.1doctest/2.4.11[layout]cmake_layoutTo use Conan more comfortably, we leverage the cmake-conan wrapper. We're specifically interested in the conan_provider.cmake file, which we save at the root of the project.
This file will come in handy later.
The libfoo target
The libfoo target, which in our case is a static library, follows the canonical shape of a standard library. Going back to the idea of one target per subdirectory, our CMakeLists.txt is the one below.
### Library libfooadd_library(libfoo STATIC src/foo.cpp include/libfoo/foo.hpp)add_library(libfoo::libfoo ALIAS libfoo)set_target_properties(libfoo PROPERTIES VERSION 0.0)target_include_directories(libfoo PUBLIC include PRIVATE src)target_link_libraries(libfoo PRIVATE fmt::fmt)target_compile_options(libfoo PRIVATE -Wall -Wextra -pedantic -Werror)target_compile_features(libfoo PRIVATE cxx_std_17)### Testing libfooadd_executable(libfoo_tests tests/main.cpp)target_link_libraries(libfoo_tests PRIVATE doctest::doctest)target_compile_options(libfoo_tests PRIVATE -Wall -Wextra -pedantic -Werror)target_compile_features(libfoo_tests PRIVATE cxx_std_17)### Subdirectoriesadd_subdirectory(docs)There are three sections:
- The library definition and its configuration.
- Setting up and creating the target for the unit tests.
- Enabling and configuring Doxygen for documentation generation.
For clarity, here is the contents of the CMakeLists.txt in the docs folder.
set(DOXYGEN_ALPHABETICAL_INDEX NO)set(DOXYGEN_BUILTIN_STL_SUPPORT YES)set(DOXYGEN_CASE_SENSE_NAMES NO)set(DOXYGEN_CLASS_DIAGRAMS NO)set(DOXYGEN_DISTRIBUTE_GROUP_DOC YES)# set(DOXYGEN_EXAMPLE_PATH "")set(DOXYGEN_EXCLUDE bin)set(DOXYGEN_EXTRACT_ALL YES)set(DOXYGEN_EXTRACT_LOCAL_CLASSES NO)set(DOXYGEN_FILE_PATTERNS *.hpp)set(DOXYGEN_GENERATE_TREEVIEW YES)set(DOXYGEN_HIDE_FRIEND_COMPOUNDS YES)set(DOXYGEN_HIDE_IN_BODY_DOCS YES)set(DOXYGEN_HIDE_UNDOC_CLASSES YES)set(DOXYGEN_HIDE_UNDOC_MEMBERS YES)set(DOXYGEN_JAVADOC_AUTOBRIEF YES)set(DOXYGEN_QT_AUTOBRIEF YES)set(DOXYGEN_QUIET YES)set(DOXYGEN_RECURSIVE YES)set(DOXYGEN_REFERENCED_BY_RELATION YES)set(DOXYGEN_REFERENCES_RELATION YES)set(DOXYGEN_SORT_BY_SCOPE_NAME YES)set(DOXYGEN_SORT_MEMBER_DOCS NO)set(DOXYGEN_SOURCE_BROWSER YES)set(DOXYGEN_STRIP_CODE_COMMENTS NO)doxygen_add_docs( libfoo_docs "../include/" ALL COMMENT "Generate HTML documentation for libfoo")The standalone target
Unlike the libfoo target, this one is much more trivial. The configuration follows.
add_executable(standalone main.cpp)target_link_libraries(standalone PRIVATE fmt::fmt libfoo::libfoo)target_compile_options(standalone PRIVATE -Wall -Wextra -pedantic -Werror)target_compile_features(standalone PRIVATE cxx_std_17)Building
cmake -B build -S . -DCMAKE_PROJECT_TOP_LEVEL_INCLUDES=conan_provider.cmake -DCMAKE_BUILD_TYPE=Debugcmake --build build --config DebugWith the first command we run the out-of-tree configuration phase, generating a build system.
With the second one we build the project by calling the system build tool, make on Unix.
Remember the conan_provider.cmake file mentioned earlier?
Well, by using the -DCMAKE_PROJECT_TOP_LEVEL_INCLUDES=conan_provider.cmake flag in the cmake configuration process, cmake automatically invokes the conan install command, simplifying project management.
Conclusion
Now in the build folder, under the project root, we'll find the binaries and libraries we compiled, plus the Doxygen documentation and the unit-test executable.
This structure can easily be expanded by adding a CI/CD pipeline and more.
I hope this was useful. At this link you can find the repository of the project discussed in this article so you can study it.
Last updated
2024-03-28.
Article source content/blog/cpp_project_structure.